
So we are back with our second installment of Trash Talk. In case you missed the first this is where we take an item that is often left at an estate sale because they are no longer current, or there are too many of these available and we think we don't need it and transform it into something else, or give it a new use. This is an entertainment center changed into a child's play kitchen. Not an original idea, there are a lot of examples out there online to give you inspiration if your entertainment center looks different then ours.
We sadly do not have an exact before photo, because the picture was lost, but we found one online that is almost identical...so here is the before look....

they cut the bottom of the photo off, but beggars can not be choosy, so we are grateful for the picture. The only thing different about ours is that the slot over the glass doors actually had a wood back panel there, and our doors below the big opening had a curve to allow you to pull it open.
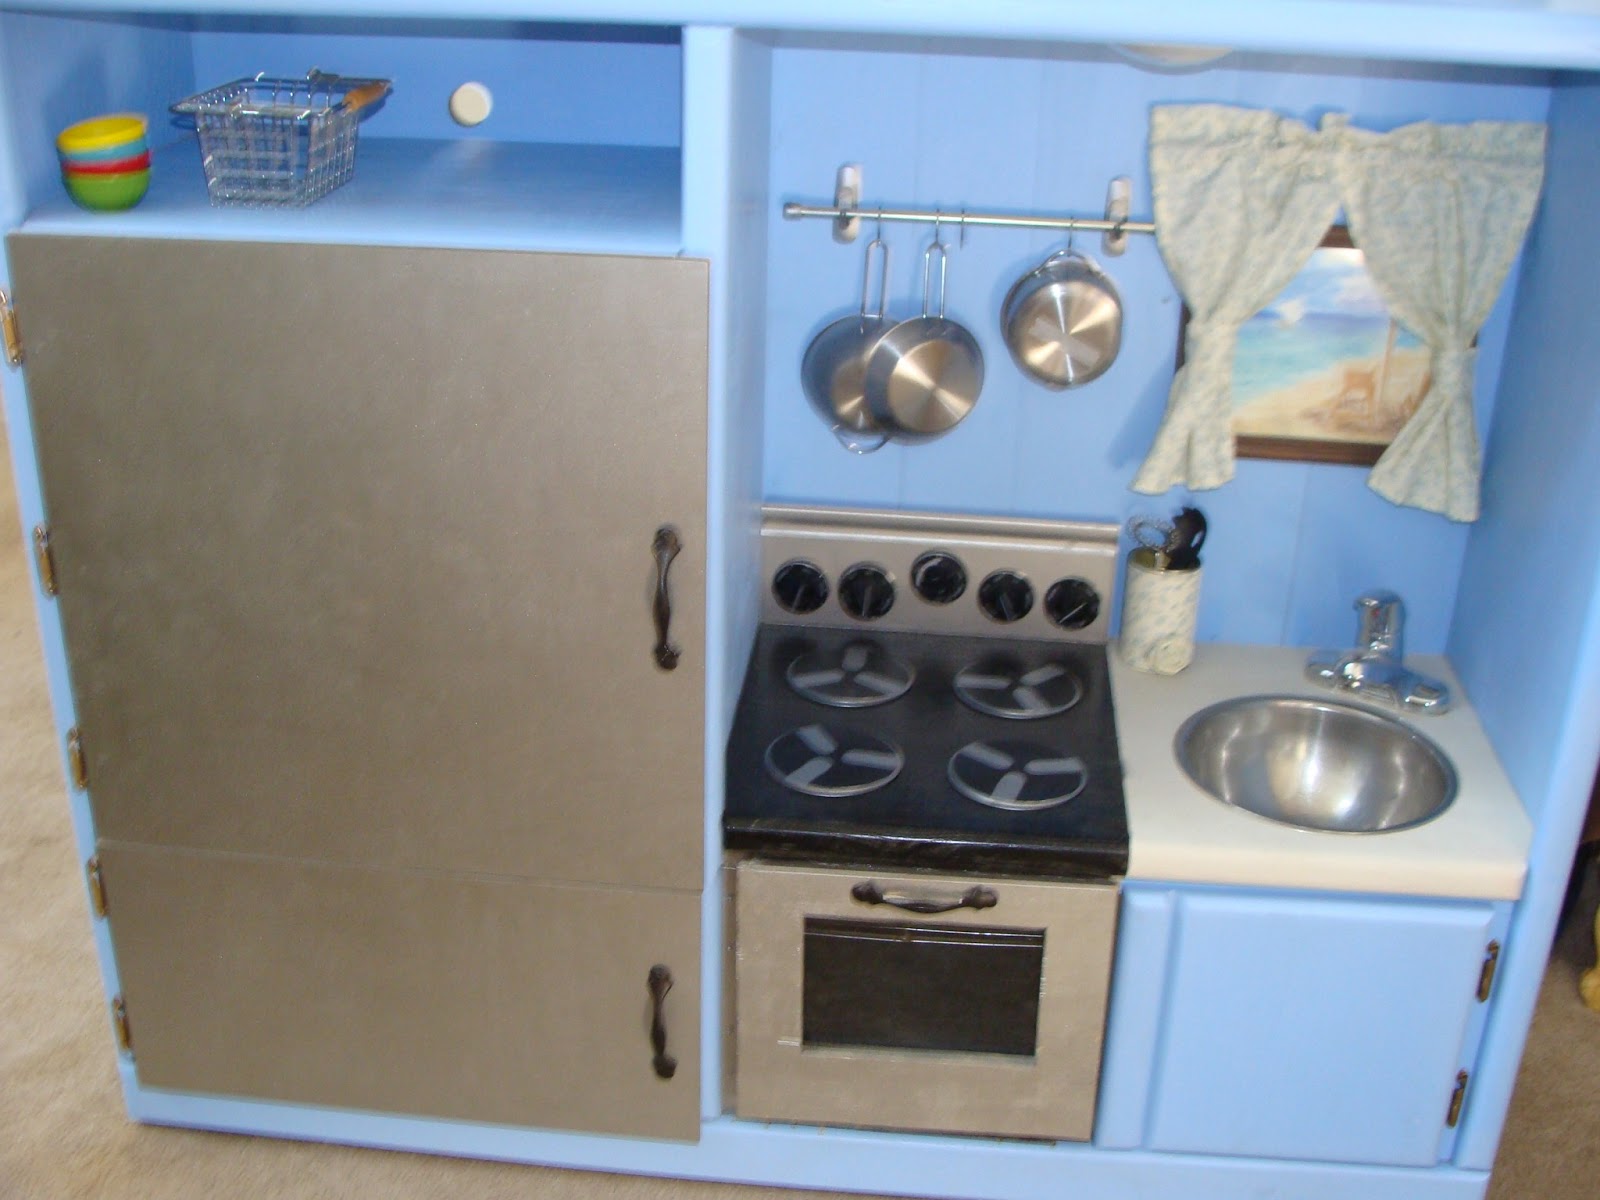
So after some work here is our after:

We do not have pictures of the work as it was on going, but I am going to try and talk you through it...well actually write you through it. We were not going to be putting this on the blog when we were working on it, so I apologize, but you can still do this. Two women who have never worked with any power tools before did this. So if you have even plugged in a drill you are ahead of us on this.
Where to start....well we removed the glass doors. This is for children and we decided it was best to not risk them getting broke during play. So after we removed the glass doors we removed the two small doors under the big opening. We painted the outside the one door and trim with some leftover paint (also available at estate sales), it took less than a quart and we have plenty of left over for another project. We did not paint the inside, why we thought the inside of the refrigerator is usually white not stainless or black like the outside sometimes is.

Then we divided the cabinet under the big opening by measuring the whole thing an then cutting a piece of wood to fit under there.

We painted to match what would be the inside of the oven on one side and under the sink on the other. We used L brackets to attach it to the floor and the ceiling.


you can not even tell it was not always like that. We also used a piece of wood that we spray painted silver to put in the front to hide the piece of wood we used as the divider. There originally was nothing there. It now makes the opening for the oven. We used L brackets to also hold in the "oven rack" which is actually an old cookie cooling rack. Available at our estate sales all the time. The rack can come in and out if needed. For the top we used blue painters tape to find the center and mark off what would be the sink area and the stove top. We spray painted each half from cans we found at sales.

For the sink we used an old bowl and just cut a hole in the top and dropped it in. We made sure it would fit and then we used liquid nails to secure it.

For the faucet we used an old bathroom sink faucet that some one had replaced and was now just hanging out in the garage. This was also liquid nailed down. The handle does move up and down like a regular sink. For the back of what was the large opening we just took an old piece of wood and nailed it onto the back. We used regular nails and just put lots in around the edges. It is very secure.
For the stove where the knobs are we found an old piece of what we think is a cabinet and we just cut it to fit and painted it. Any piece of wood would work. The knobs were not found out an estate sale, but at the Habitat For Humanity store on Grand Avenue. They sell old pieces from houses like cabinets, knobs, dishwashers, tiles, faucets even. So we went there and got the knobs. You could buy new or wait patiently for them to be at a sale, but we opted for HFH. We attached the knobs with screws from the back side, we did have to get special screws to be able to allow them to still turn. Sorry not sure what they are called, we went to Ace and explained what we wanted to do and they pointed us to the right screws. After we got the screws attached we used liquid nails to glue it to the back board.
For the burners we used door knob wall protectors and we just spray painted them black to match the stove.

We painted the spokes on with some silver paint that we had, and then liquid nails came to the rescue again.

The pot rack is a small tension rod that we spray painted, because it was an ugly gold color. Then we used Command Strip hooks (that we also spray painted) for the holders.

The pots and pans are from IKEA. The hooks to hang the pots are actually flower pots hooks.
 We got these at the Walmart in the hardware department. They worked out great. We of course spray painted them also.
For the curtain and window we used more Command Hooks (didn't paint them) and just a wooden dowel, we left as is. Then just sewed up curtains and added them to the dowel. For the window we used an 8X10 frame and then a drawing we made for a beach scene to look out at. You could use a picture from a magazine or even a child's drawing.
 For the utensil holder we took a can from some canned vegetable and cleaned it out good and made sure there were no sharp edges and the we covered it in the same material as the curtains. For the material you could even use an dress, old curtains, even a t shirt. Recycle. The utensils pictured are also from IKEA, but some times there are small versions of items at the sales. Just be on the look out.
The oven door....well to be honest that was the hardest part of the whole job. We were not happy to have just the door, we wanted to be able to see inside, like a regular oven door. The first door we made from the original door and it broke in several places. The second door we were more careful with. We drilled small holes to start the saw with and were careful to not drill too close to the edges. It took time, but worth ever second. We used a piece of plexiglass we bought at the Home Depot, but you could use a piece of plastic from a picture frame (ones that use plastic instead of glass) or not even cut the hole. We considered just painting the center to look like it was glass. If the second door had not come out okay that is what we would have done. We attached the plexiglass with picture hanging saw tooth things. That is the technical name too.


We moved the hinges from the side panel to the bottom so the oven would open like a real oven Then the door would not stay closed so we added to strong magnets on each corner of the door and on the opening so they would meet and hold together. It worked out great. It is not hard for children to open, but it secure in that it will not fall open.

For the refrigerator and freezer we replaced the glass doors and just cut a large piece of wood in two to fit and spray painted the whole thing. We had to get new hinges for the oven door and the fridge doors to make sure that it was on securely. They were bought at Ace or Home Depot. We wanted to be sure they were not going any where since children were playing with them.
We used old cabinet handles for the fridge and oven handles. We just drilled holes where we wanted them and then screwed them in from the back.
We used pantry baskets that attach to the wall to hold spices and bottles for our door racks also.

We drilled small holes, not all the way through and then attached with screws. In the freezer we used a rack to be the makeshift ice cube tray holder.

On one side we used an old cabinet door that we spray painted the frame with one color and then used chalkboard paint to paint the inside. We attached this with just plain Command Strips. So now the kitchen has a memo board as well. The other side we used Command hooks again to be towel and oven mitt holders. The towels are just a regular tea towel that we cut in half and sew up the edge to make a smaller child size towel. For the oven mitt we used tea towel again and cut it in half and the folded in quarters to make a thick mitt and then sewed up the edges. we added a piece of ribbon to each for hanging.


 you could just use the oven door handle too.
We also want to add a phone on the side, but have not yet found the right one.
So that is our kitchen, it was a little learn as we go, but worth every second when the children you are giving it to sees it and loves it. Here are more random pictures of the completed project...


 I forgot this we used those press on lights for above the sink and in the fridge. We attached them with command strips so we could remove them to replace the batteries when needed.
Overall a great project and one you could do. So next time you see an old outdated entertainment center at one of our estate sales....just think of the possibilities. Most of the other pieces and components also came from estate sales so start searching for all you need.
Maybe this is a dumb question BUT how did you remove the glass doors? Looks like your center had the same weird hinges as mine.
ReplyDelete